Pages

Sunday, September 25, 2016

Bacon Chili Cheese Fries, anyone?

It's the foosball season!  (The Waterboy...watch it.)

I know, we're already into the 3rd week of the season, but I have the Superbowl on my mind each week, which makes me think of party food.

So many choices, but a lot of Sundays to make some good grub.

Let's make some bacon chili cheese fries, shall we?  Mmmmmm....

You have a couple of choices to make.  Homemade fries or frozen?  Homemade chili or canned?  I did homemade for both.

The fries:

potatoes, I use your standard cheapo bag of potatoes
oil, I use canola

You can peel your potatoes or not, whatever you prefer.  Cut your potatoes into the thickness of fries you like and put them in a bowl of water as you cut them.  (They'll brown if they are exposed to air.)

These can sit while you throw together a pot of chili.

The chili:

1 lb. hamburger
1 can kidney beans
1 can black beans
4 cans of tomato sauce, give or take (or whatever style of canned you like; crushed, diced...)
chili powder
cayenne
salt

This is really easy and shouldn't take more than maybe 10-15 minutes.

Brown your hamburger and drain.  Back into the pot it goes and dump everything else in, including a palmful (you might even add more) of chili powder, and start off slowly with the cayenne if you get my drift.  As far as the tomato sauce goes, you can add as much or little as you want to make it thicker.  Adjust the seasonings to your taste and let it simmer.

The toppings:

BACON.  Fry it until nice and crispy, then drain and crumble it.  (Might need two packs to allow for nibbling!)
Cheese (cheddar, pepper jack, colby jack...)
Sour cream
Cayenne


Back to the fries:

Heat the oil to 300° It will initially jump higher, but when it starts to cool down make sure you keep your temp between 325°-350°  (I know, my oil was way too hot.  I let it come down before frying.)

This is really important; with a clean dish towel, dry the potatoes batch by batch as you fry them.
water + oil = bad
The size of your pot will determine how many fries are in each batch.  For a Dutch oven you can probably put 15-20.  I used a smaller pot so I would use less oil and it could be deeper, and did around 10 fries at a time.

Fry until they're golden brown.  There's not really a time frame, just watch them.  Do not walk away!

Salt when they're on the draining rack.

Put it all together!

Create a beautiful pile of fries, chili, cheese, sour cream, cayenne, and that bacon you've been smacking your family's hands away from!

Park yourself
and
enjoy!


Some extra tips:
Extra fries can be...
fridged and microwaved, but they'll be soggy.
fridged and baked and will be less soggy.
frozen, then baked like frozen fries you'd buy from the store. (freeze separately on a tray then put in a ziploc.)

Chili leftovers are delish, but can also be frozen in individual servings or a family sized freezer ziploc.  When you put it in the freezer lay it flat so it thaws evenly later and fits better in your freezer.

Wow, now I'm really hungry.  Until next time!

GO HAWKS!
 Print Recipe
Find me on:

Tuesday, September 20, 2016

Oops. Well...

So I tried something new thinking it would be quick and delicious.  After multiple attempts with adjustments to the recipe, my taste tester and I have decided that the results are below meh.
The plan was to make a mug bread pudding.  Yum, right?

Here we go.

5 T. milk
1 egg
1 T. sugar
1/2 tsp. cinnamon
1/2 tsp. vanilla
1 slice of buttered bread, cut into bite-size pieces
Mix the first 5 ingredients in your mug, add the bread, let it soak for 5-10 minutes, microwave for 1 to 1 1/2 minutes.

Fail.

It was mushy, the egg (custard mixture) wasn't fully cooked, yuck.

Take 2.

Same ingredients, but I cut the bread into bigger pieces trying to eliminate the mushiness.  I also put everything except the bread into our Magic Bullet so it was completely blended. (Cinnamon is like cocoa and doesn't mix well.) AND, I upped the microwave time in increments of thirty seconds. Turns out after four minutes (!) it was cooked.

Results?

Still not great. I guess if you tell yourself it's like French toast, umm, maybe.  But it's not.

So here's the deal...if anyone can turn this into something delicious, let me know! I love a good mug recipe! Tonight's failed bread pudding is forcing me (heh...) to make a mug brownie, which is one recipe we have perfected!


Friday, September 16, 2016

Seasoning Cast Iron

You've invested in Lodge Cast Iron.  What now?
You're going to love this!

Wash your new cast iron with dishsoap-y water.  You'll never (usually) want soap to touch your cast iron again, but it's brand spanking new and you'll want to start clean.

Dry well, then coat your entire piece with a thin coat of vegetable oil; inside and out.  Make sure to get all those nooks and crannies!  Don't drench it, but do have a nice coating.  This will become part of your cookware and the oil will create a non-stick surface.

(Our daughter is allergic to eggs so I do soap ours after we've made something with eggs, then just coat it with oil again and put it away.)

One of the beautiful things about cast iron is that if you do have to soap it, you can easily re-season.  It will last for years, decades, centuries!  These will become family heirlooms that anyone will be happy to inherit!

Worth noting and pretty important, cast iron does not instantly become non-stick.  It will continue to get better with use.  Don't expect your eggs to be slip-sliding away just yet.

Now, place your cookware *upside down* into a 350-400 degree oven and bake for an hour.  Use a cookie sheet on the lower rack to catch drips.

Turn the oven off and leave it to cool.

Cast iron gets SCREAMING HOT, so don't go grabbing the handle, even when you're cooking on the stove top.  I rest a hot pad on the handle so I don't forget.  (Been there, done that.  Bad words will come out.)  Lodge also makes a handle cover that you might find useful; Lodge Silicone Hot Handle Holder, Red

When you wash your cast iron, scrub it well with a sponge, brush, Brillo pad, etc., but BE GENTLE otherwise you'll remove the seasoning.  Rinse and *immediately* dry well, then re-oil the entire piece.  Even if you see a bit of rust, just scrub it off and oil.

Oil attracts dust and I confess, I store mine in the oven.  Once the piece is seasoned you won't have to continually oil the outside, but do make sure it is completely dry, and do oil the inside every time you use it.


So the bottom line is, cast iron gets better the more fat is cooked in it. ;)


Wednesday, September 14, 2016

Ode to the grilled cheese!

Fall, my favorite time of year.  We add an extra layer of clothing, sweaters come out, the smell of smoke fills the air from fireplaces that have been waiting for these days since last winter.  It's time to get back into some of that soul feeding comfort food.

Enter the grilled cheese sandwich.

How can that be wrong?

For so many years my grilled cheese sandwich has been butter-bread-cheddar-bread-butter, but one day I threw in a twist by making a spread of cream cheese and jalapeno, morphing my basic grilled cheese into creamy deliciousness.

Once the sea had parted, I saw endless possibilities.

Join me on this journey!

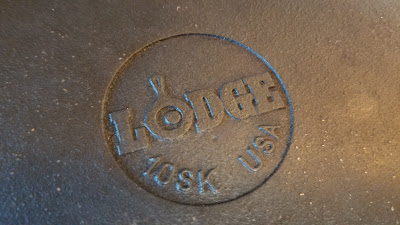
First things first, let me introduce you to the amazingness of Lodge Cast Iron (ooohs and ahhhs!)  Your bacon and butter will love your cast iron.  Your cast iron will love your bacon and butter.  (I will be doing a separate post about seasoning your cast iron, so be sure to watch for that! Here it is! Seasoning)  Once your cast iron is seasoned properly it will become your favorite go-to pan.  Non-stick, and able to retain heat and distribute it evenly are a few of the benefits of well taken care of Lodge cookware.

...happens to be one of my favorites!


Lodge is the BEST!

Enter the players:

avocado, pepper jack, colby jack, butter, jalapeno, bacon, cream cheese
Avocado, pepper jack, colby jack, real unsalted BUTTER
jalapenos, BACON, cream cheese!


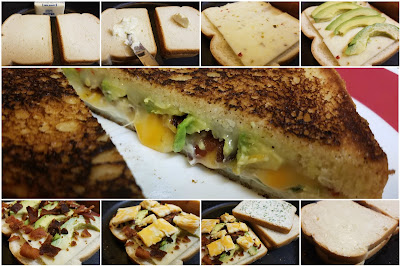
Just do it.
Assemble your grilled cheese, customizing it to your tastes, and grill to toasty goodness.

I cooked my bacon until it was really crispy, then crumbled it directly onto the sandwich.
Other suggestions for switching it up are:
  • sriracha stirred into cream cheese (YUM.)
  • crumbled blue cheese with thinly sliced pear and a drizzle of honey
  • smoked swiss and fresh sliced tomato
  • etc. etc. etc. etc. etc.!
If you really want to go crazy, you can butter your bread with garlic butter and fill it with fresh basil pesto, a bit of pasta sauce, and mozzarella.

Of course this is always perfect with a bowl of hot tomato soup, (Progresso Basil and Tomato is a hit in our house,) but this grilled cheese has enough extras to be a meal of its own.


What are some of your favorite things to put in a grilled cheese?

Print Recipe
Share a picture on my Facebook page
using the hashtag
#baconbutterbliss

Find me on:
Facebook
Pinterest
Instagram
Twitter
and